
Installation d’OPNsense sur un Sophos XG 210 rev3
Étape 1 — Installation#
Récupérer l’image .img sur le site web d’OPNsense (AMD64 – VGA – OPNsense)
Flasher une clé USB avec cette image et démarrer (boot) sur la clé (Rufus ou balenaEtcher).
Depuis PuTTY, préparer la connexion série à 115200 bauds, sans contrôle de flux.
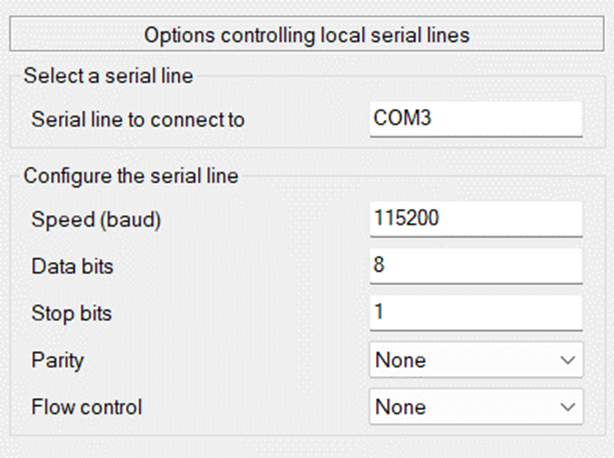
Ensuite, démarrer le pare-feu avec la clé USB branchée : sur les pare-feux XG, l’USB est prioritaire au boot.
Une fois le système lancé, utiliser les identifiants :
- Utilisateur : installer
- Mot de passe : opnsense
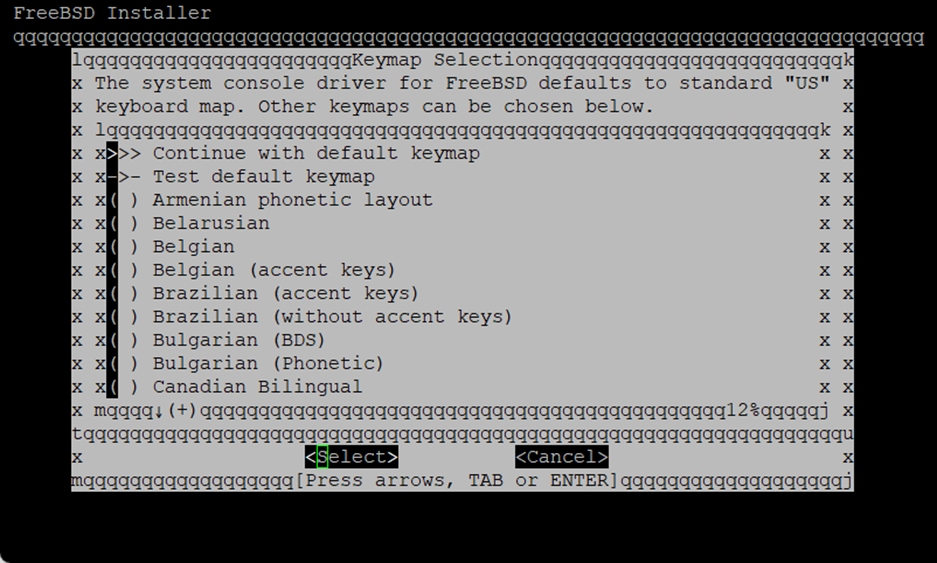
On arrive sur l’installateur. Choisir la langue du clavier « french / fr.kbd », puis valider avec Espace puis Entrée.
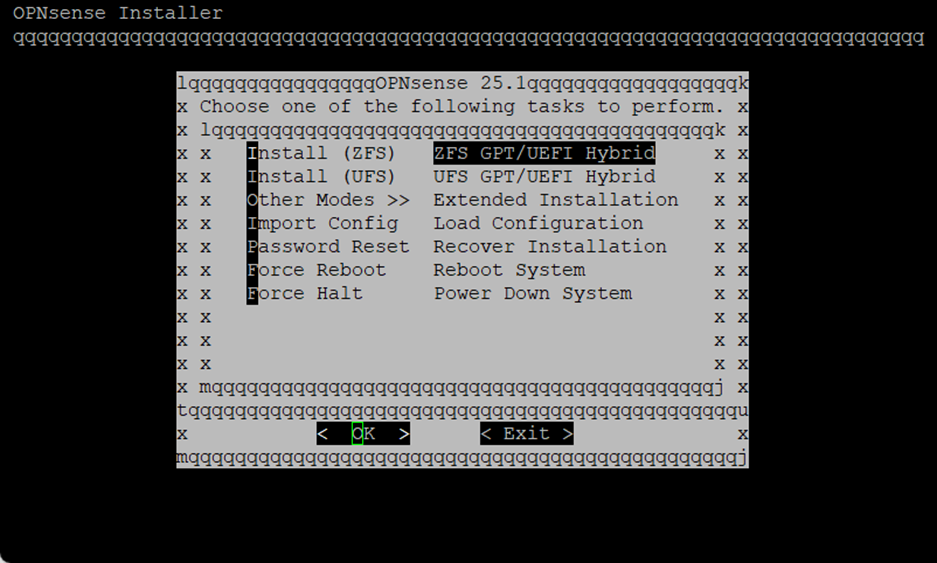
Choisir le type de partitionnement : ZFS.
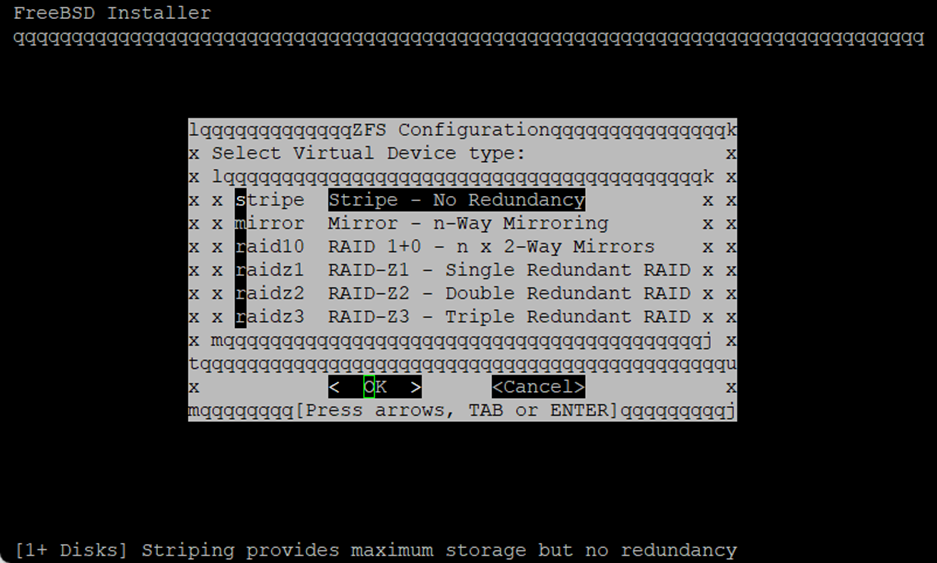
Ne pas activer de redondance disque : Stripe.
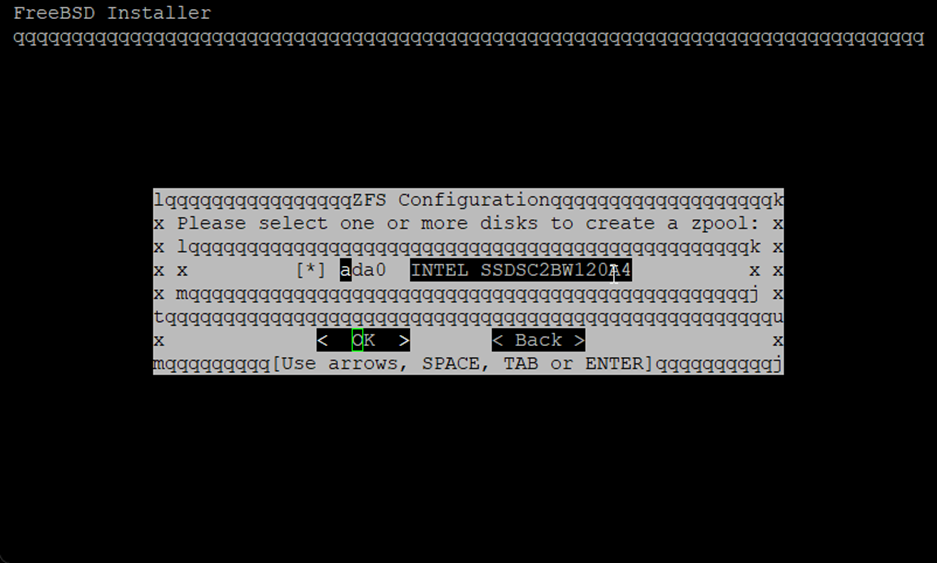
Sélectionner ada0 comme disque d’installation. À la confirmation d’effacement des données, choisir « YES ».
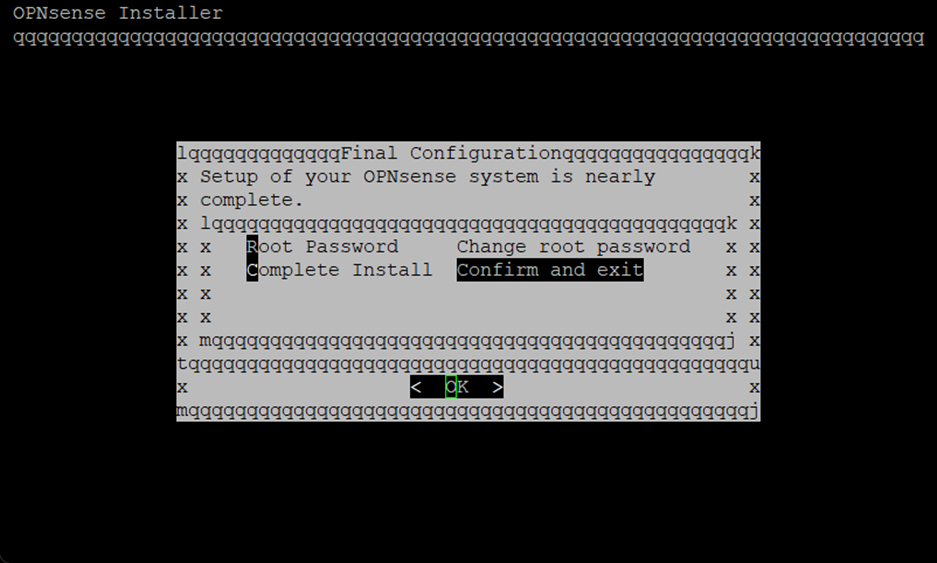
Choisir « Complete Install » : le mot de passe root pourra être changé ensuite via l’interface web.
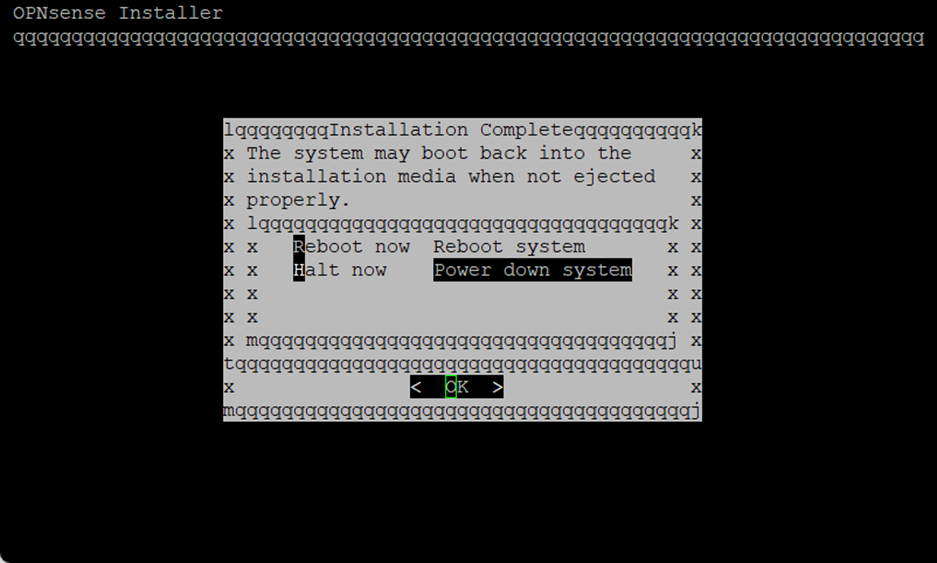
Éteindre le pare-feu puis retirer la clé USB en toute sécurité.
Étape 2 — Accès Web#
Accéder à l’interface web via : https://192.168.1.1 sur l’interface LAN (le WAN est aussi client DHCP et l’interface web écoute par défaut sur toutes les interfaces).
- Branchements / accès
- Se connecter sur un port LAN du Sophos (ou sur le switch du LAN).
- Mettre le poste client en DHCP (par défaut) ou, si besoin, en IP statique dans le réseau du LAN (ex :
192.168.1.x/24). - Ouvrir un navigateur et aller sur https://192.168.1.1 (accepter l’exception si le certificat est auto-signé).
- Identifiants par défaut
Identifiants par défaut : username : root password : opnsense
- Assistant de première configuration (recommandé)
- Définir le nom d’hôte et le domaine.
- Définir les DNS (ou conserver ceux de votre réseau).
- Vérifier la config WAN (DHCP par défaut) et la config LAN (IP/masque).
- Changer le mot de passe
root.
- Mises à jour + reboot
- Lancer les mises à jour : Système → Firmware → Mises à jour
- Appliquer les upgrades si proposés, puis redémarrer si nécessaire.
- (Optionnel) Interface sombre
Interface sombre : Système → Settings → Général → Thème → opnsense-dark
Étape 3 — Configuration#
Configuration réseau (exemples) : LAGG LACP + VLAN + règles + NAT + DHCP.
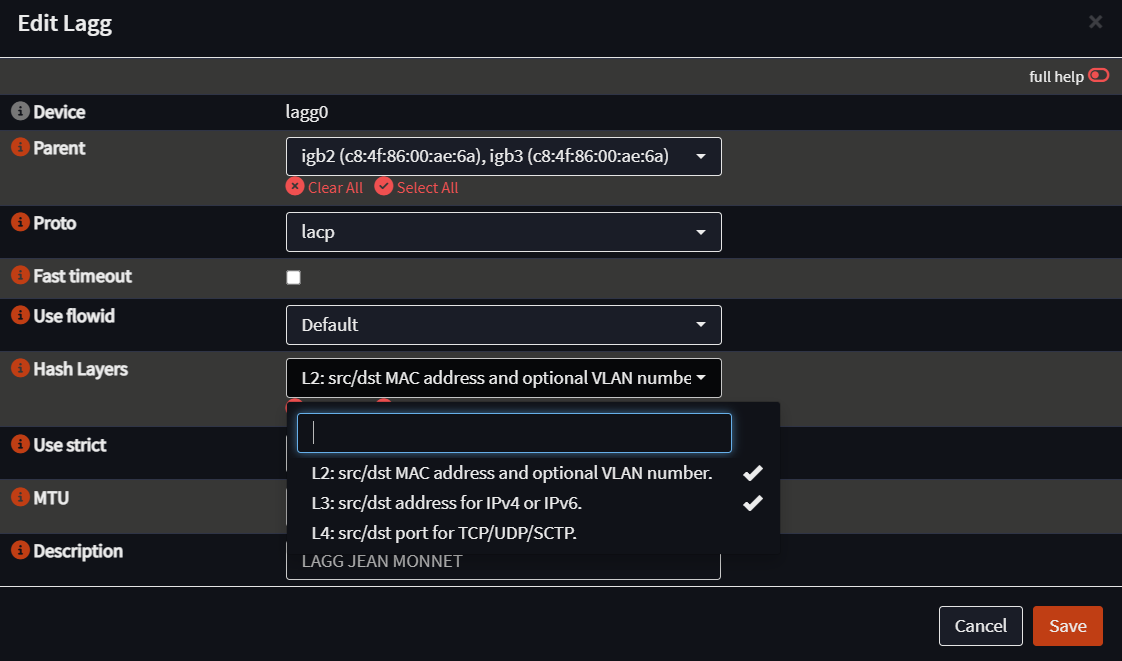
- “ Créer le LAGG (LACP)
- Chemin : Interface → Device → LAGG
- Type : LACP
- Sélectionner les ports physiques à agréger (ex :
igb0+igb1). - Choisir l’algorithme/hash (L2/L3 selon besoin).
- Assigner l’interface LAGG
- Chemin : Interfaces → Assignements → Device (LAGG) → Add
- Ouvrir ensuite l’interface créée (ex :
LAGG0) et :- Cocher Enable
- (Optionnel) Définir une description explicite (ex :
TRUNK_SWITCH)
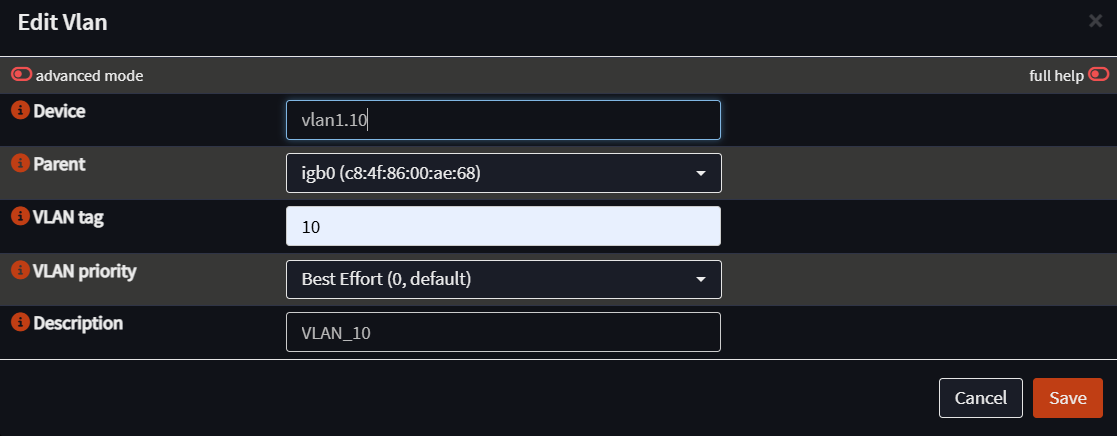
- Créer un VLAN sur le LAGG (ex : VLAN 10)
- Chemin : Interfaces → Devices → VLAN
- Parent : l’interface LAGG (ex :
LAGG0) - VLAN tag :
10 - Description :
VLAN_10
- Assigner et configurer l’interface VLAN (IP passerelle)
- Chemin : Interfaces → Assignements : ajouter le VLAN (il apparaît souvent sous un nom du type
VLAN 10 on LAGG0). - Ouvrir l’interface (ex :
VLAN_10) et :- Cocher Enable
- IPv4 Configuration Type → Static IPv4
- IP / passerelle du VLAN (ex :
10.10.10.254/24) - Save puis Apply
- Règles Firewall (minimum viable)
- Chemin : Firewall → Rules → VLAN_10
- Ajouter au moins :
- Autoriser
VLAN_10 net→This firewall(DNS, DHCP si nécessaire) - Autoriser
VLAN_10 net→any(pour un lab) ou seulement vers Internet selon besoin
- Autoriser
- Côté WAN : laisser la politique par défaut (en général, pas d’entrant).
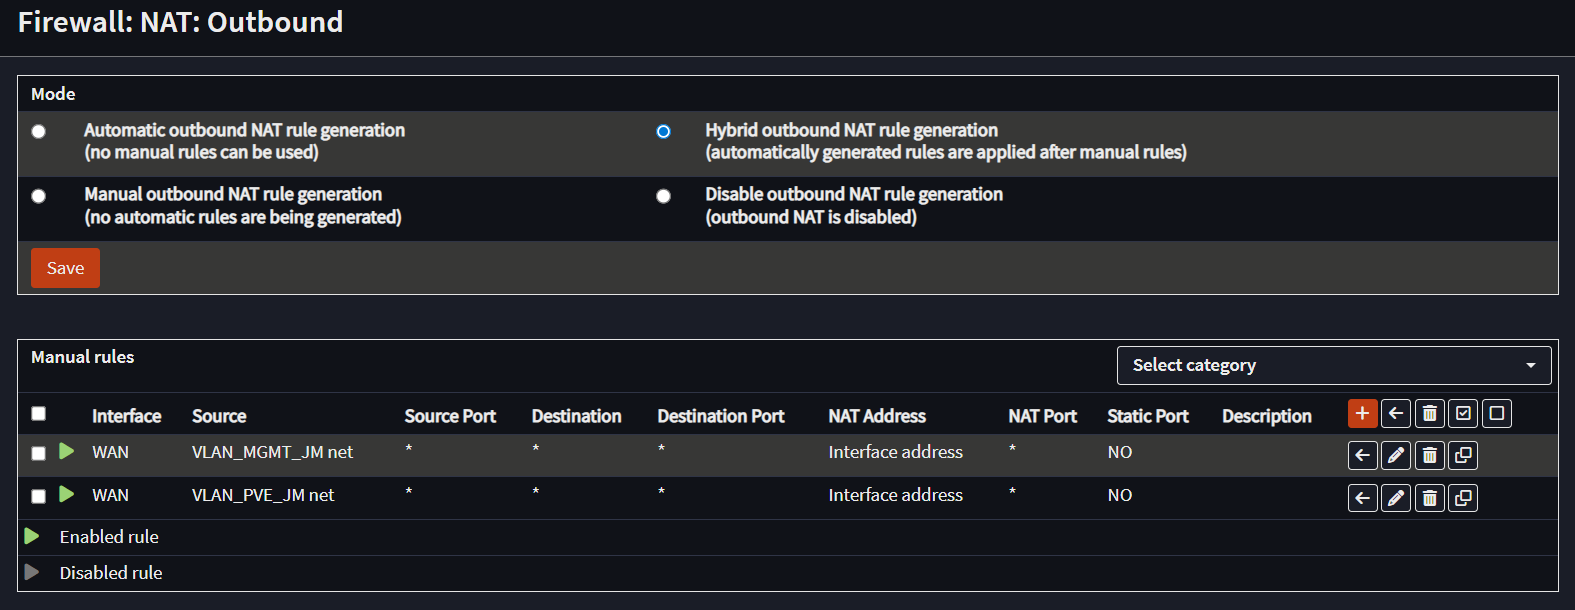
- NAT sortant (si le VLAN doit sortir sur Internet)
- Chemin : Firewall → NAT → Outbound :
- Mode Automatic (souvent suffisant) ou Hybrid/Manual si vous voulez maîtriser.
- Vérifier qu’une règle NAT existe pour
VLAN_10 netversWAN address.
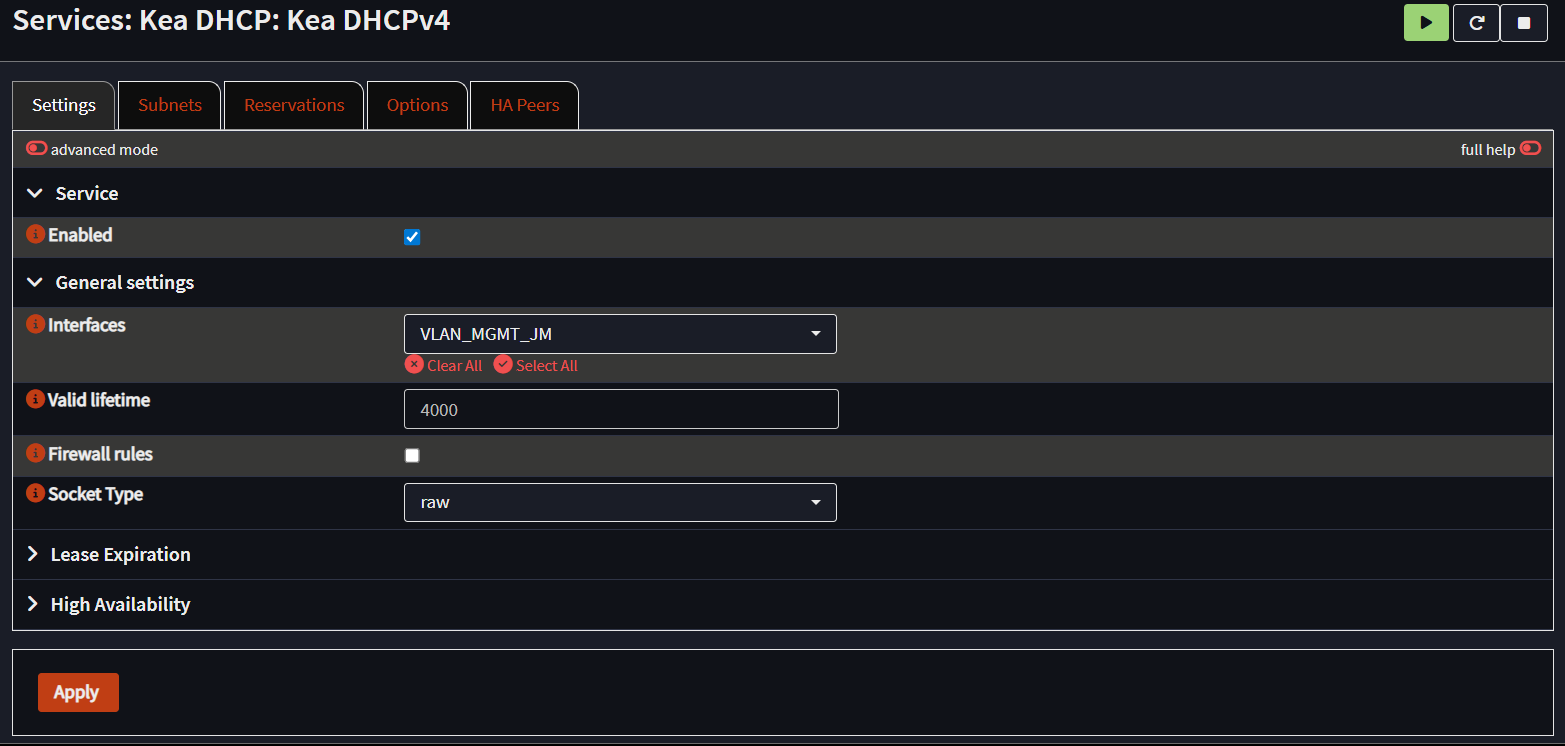
- DHCPv4 (Kea) sur le VLAN
- Chemin : Services → Kea DHCP → Kea DHCPv4
- Activer le service puis créer un subnet pour
VLAN_10:- Réseau :
10.10.10.0/24 - Pool (ex) :
10.10.10.50→10.10.10.200 - Router (gateway) :
10.10.10.254 - DNS : à définir (voir Options)
- Réseau :
Puis Subnets → Add :
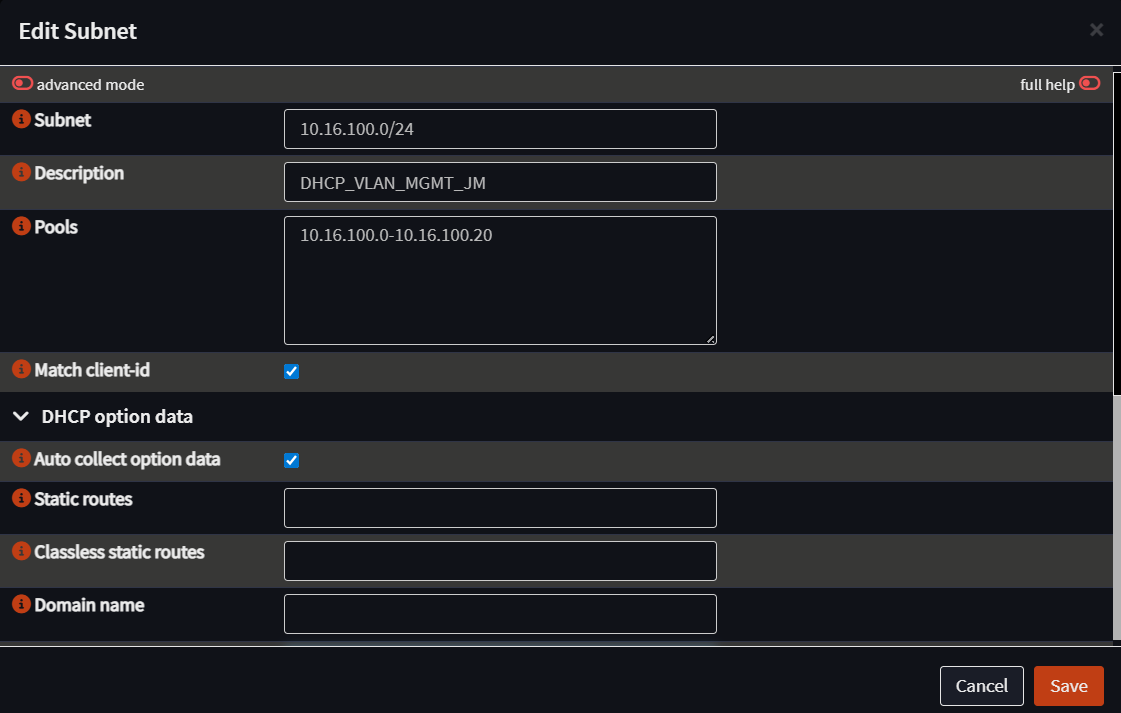
Pour définir un DNS, voir l’onglet Options.
- Redirection de ports
Supposons avoir un service en HTTP coté LAN, on veut une redirection de port depuis le WAN sur le port 500.
Pare-feu → NAT → Destination NAT → +
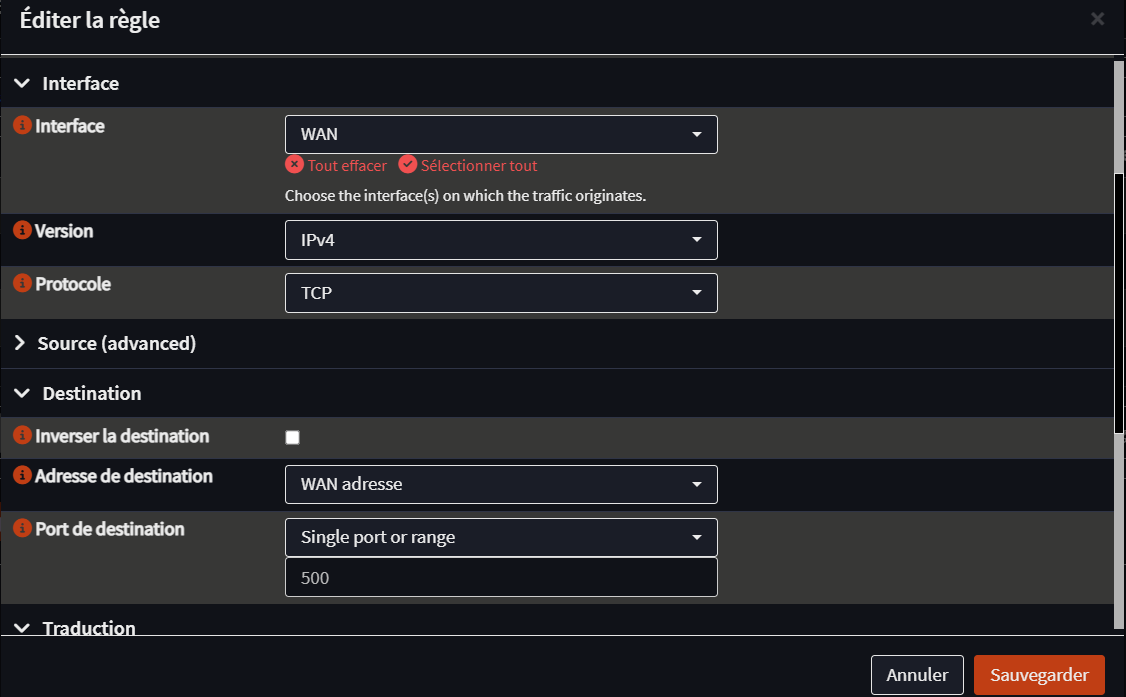
On choisit l’Interface WAN en ipv4 et TCP.
La destination correspond d’ou arrive le traffic, ici ce sera une ip du sous-réseau WAN. On choisit le port 500 par exemple.
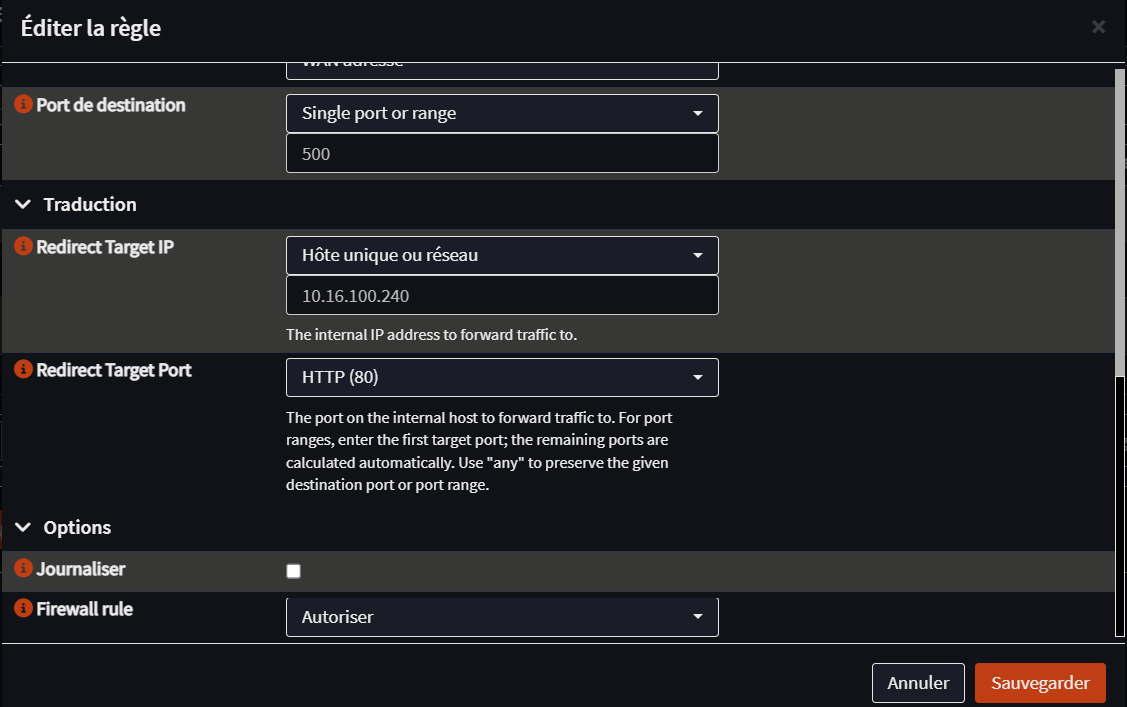
On donne l’ip qu’on veut rediriger et le port du service réel. On autorise Firewall rule.
Bonus — Écran LCD (Sophos XG) via LCDd + script#
La première étape d’installation peut être faite en mode graphique ou en CLI.
Dans Firmware → Greffons, rechercher lcd puis installer le greffon os-lcdproc-sdeclcd. Il génère une configuration de base que l’on va modifier.
1.1 — Configuration de l’écran LCD avec des scripts#
A) Accès CLI + installation de nano#
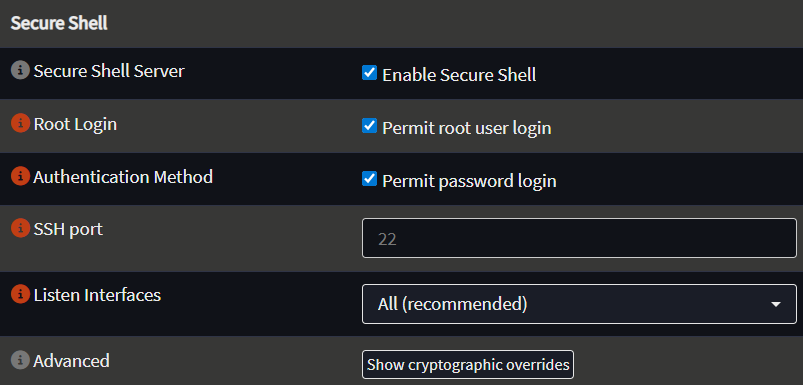
Autoriser connexion ssh en root login et password login ( System → Settings → Administration → Secure Shell)
Ajouter le plugin os-lcdproc-sdeclcd ( System → Firmware → Plugins )
Depuis un terminal, se connecter en SSH sur l’utilisateur
rootOn arrive sur l’interface de gestion d’OPNsense en CLI : taper
8pour accéder au “vrai” shell.Installer nano :
pkg install nanoB) Fichiers à modifier#
/usr/local/etc/LCDd.conf/usr/local/etc/LCDd-sdeclcd.conf/usr/local/etc/lcdproc.conf
⚠️ La configuration est légèrement différente selon le modèle.
C) nano /usr/local/etc/LCDd.conf#
(écran orange, boutons ronds gris)
[server]
DriverPath=/usr/local/lib/lcdproc/
Driver=hd44780
Bind=127.0.0.1
Port=13666
ReportToSyslog=yes
User=nobody
Foreground=no
Hello="  Welcome to"
Hello="   OPNsense!"
GoodBye="Thanks for using"
GoodBye="   OPNsense!"
WaitTime=5
AutoRotate=no
ServerScreen=no
Backlight=on
TitleSpeed=5
ToggleRotateKey=Escape
PrevScreenKey=Up
NextScreenKey=Down

[hd44780]
ConnectionType=ezio
Device=/dev/cuau1
Keypad=yes
Size=16x2
KeyMatrix_4_1=Enter
KeyMatrix_4_2=Up
KeyMatrix_4_3=Down
KeyMatrix_4_4=Escape
D) nano /usr/local/etc/LCDd-sdeclcd.conf#
```
[server]
DriverPath=/usr/local/lib/lcdproc/
Driver=hd44780
Bind=127.0.0.1
Port=13666
ReportToSyslog=yes
User=nobody
Foreground=no
Hello="  Welcome to"
Hello="   OPNsense!"
GoodBye="Thanks for using"
GoodBye="   OPNsense!"
WaitTime=5
AutoRotate=no
ServerScreen=no
Backlight=on
TitleSpeed=5
ToggleRotateKey=Escape
PrevScreenKey=Up
NextScreenKey=Down

[hd44780]
ConnectionType=ezio
Device=/dev/cuau1
Keypad=yes
Size=16x2
KeyMatrix_4_1=Enter
KeyMatrix_4_2=Up
KeyMatrix_4_3=Down
KeyMatrix_4_4=Escape
```
    [server]
    DriverPath=/usr/local/lib/lcdproc/
    Driver=hd44780
    Bind=127.0.0.1
    Port=13666
    ReportToSyslog=yes
    User=nobody
    Foreground=no
    Hello="  Welcome to"
    Hello="   OPNsense!"
    GoodBye="Thanks for using"
    GoodBye="   OPNsense!"
    WaitTime=5
    AutoRotate=no
    ServerScreen=no
    Backlight=on
    TitleSpeed=5
    ToggleRotateKey=Escape
    PrevScreenKey=Up
    NextScreenKey=Down

    [hd44780]
    ConnectionType=ezio
    Device=/dev/cuau1
    Keypad=yes
    Size=16x2
    KeyMatrix_4_1=Down
    KeyMatrix_4_2=Escape
    KeyMatrix_4_3=Up
    KeyMatrix_4_4=Enter
    ```
#### D) `nano /usr/local/etc/LCDd-sdeclcd.conf`
    ```
    [server]
    DriverPath=/usr/local/lib/lcdproc/
    Driver=hd44780
    Bind=127.0.0.1
    Port=13666
    ReportToSyslog=yes
    User=nobody
    Foreground=no
    Hello="  Welcome to"
    Hello="   OPNsense!"
    GoodBye="Thanks for using"
    GoodBye="   OPNsense!"
    WaitTime=5
    AutoRotate=no
    ServerScreen=no
    Backlight=on
    TitleSpeed=5
    ToggleRotateKey=Escape
    PrevScreenKey=Up
    NextScreenKey=Down

    [hd44780]
    ConnectionType=ezio
    Device=/dev/cuau1
    Keypad=yes
    Size=16x2
    KeyMatrix_4_1=Down
    KeyMatrix_4_2=Escape
    KeyMatrix_4_3=Up
    KeyMatrix_4_4=Enter
    ```
E) nano /usr/local/etc/lcdproc.conf (client)#
[server]
Driver=hd44780
Bind=127.0.0.1
Port=13666
User=nobody
WaitTime=5
ServerScreen=no

[hd44780]
ConnectionType=ezio
Device=/dev/cuau1
Size=16x2
Keypad=no
Il est important de créer un fichier de configuration de base du client, même si en réalité il sera désactivé au démarrage pour être remplacé par le script.
F) Test + activation au démarrage#
Tester :
service LCDd onestartNormalement, on devrait voir sur l’écran : « Welcome to OPNsense! ».
Activer au démarrage :
sysrc LCDd_enable=YESG) Script d’affichage (firmware / hostname / IP LAN / IP WAN)#
Créer le script : nano /usr/local/bin/lcd_firmware.sh
#!/bin/sh

# PAGE 1 : FIRMWARE
FIRMWARE=$(/usr/local/sbin/opnsense-version | awk '{split($2,v,"_"); print $1, v[1]}' | tr ' ' '_')

# PAGE 2 : HOSTNAME
HOST=$(hostname | tr ' ' '_')

# PAGE 3 : IP LAN
LAN_IF=$(ifconfig -a | awk '/description:.*LAN/ {print iface; exit} {iface=$1}' | sed 's/://')
LANIP=$(ifconfig $LAN_IF 2>/dev/null | awk '/inet /{print $2}' | head -n1)
[ -z "$LANIP" ] && LANIP="No_IP"

# PAGE 4 : IP WAN
WAN_IF=$(ifconfig -a | awk '/description:.*WAN/ {print iface; exit} {iface=$1}' | sed 's/://')
WANIP=$(ifconfig $WAN_IF 2>/dev/null | awk '/inet /{print $2}' | head -n1)
[ -z "$WANIP" ] && WANIP="No_IP"

printf "hello\nscreen_add fw\nwidget_add fw fw_l1 string\nwidget_set fw fw_l1 1 1 FIRMWARE\nwidget_add fw fw_l2 string\nwidget_set fw fw_l2 1 2 $FIRMWARE\nscreen_add host\nwidget_add host host_l1 string\nwidget_set host host_l1 1 1 HOSTNAME\nwidget_add host host_l2 string\nwidget_set host host_l2 1 2 $HOST\nscreen_add lan\nwidget_add lan lan_l1 string\nwidget_set lan lan_l1 1 1 LAN_IP\nwidget_add lan lan_l2 string\nwidget_set lan lan_l2 1 2 $LANIP\nscreen_add wan\nwidget_add wan wan_l1 string\nwidget_set wan wan_l1 1 1 WAN_IP\nwidget_add wan wan_l2 string\nwidget_set wan wan_l2 1 2 $WANIP\n" | nc 127.0.0.1 13666
#!/bin/sh
TMP=/tmp/lcd.txt
: > $TMP
FIRMWARE=$(/usr/local/sbin/opnsense-version | awk '{split($2,v,"_"); print $1, v[1]}' | tr ' ' '_')
HOST=$(hostname | tr ' ' '_')
cat >> $TMP <<EOF
hello
screen_add fw
widget_add fw l1 string
widget_set fw l1 1 1 FIRMWARE
widget_add fw l2 string
widget_set fw l2 1 2 $FIRMWARE
screen_add host
widget_add host l1 string
widget_set host l1 1 1 HOSTNAME
widget_add host l2 string
widget_set host l2 1 2 $HOST
EOF
i=1
ifconfig -a | awk '
/flags=/ {iface=$1; sub(":", "", iface)}
/inet / {
print iface " " $2
}' | while read IF IP; do
case "$IF" in
lo*|pflog*|pfsync*|enc*) continue ;;
esac
cat >> $TMP <<EOF
screen_add if$i
widget_add if$i l1 string
widget_set if$i l1 1 1 $IF
widget_add if$i l2 string
widget_set if$i l2 1 2 $IP
EOF
i=$((i+1))
done
nc 127.0.0.1 13666 < $TMP#!/bin/sh
TMP=/tmp/lcd.txt
: > $TMP
FIRMWARE=$(/usr/local/sbin/opnsense-version | awk '{split($2,v,"_"); print $1, v[1]}' | tr ' ' '_')
HOST=$(hostname | tr ' ' '_')
cat >> $TMP <<EOF
hello
screen_add fw
widget_add fw l1 string
widget_set fw l1 1 1 FIRMWARE
widget_add fw l2 string
widget_set fw l2 1 2 $FIRMWARE
screen_add host
widget_add host l1 string
widget_set host l1 1 1 HOSTNAME
widget_add host l2 string
widget_set host l2 1 2 $HOST
EOF
i=1
ifconfig -a | awk '
/flags=/ {iface=$1; sub(":", "", iface)}
/inet / {
print iface " " $2
}' | while read IF IP; do
case "$IF" in
lo*|pflog*|pfsync*|enc*) continue ;;
esac
# Récupère description, compactée (ou 'no-desc' si absente)
DESC=$(ifconfig $IF | awk -F ': ' '/description: /{print $2}' | tr ' ' '_' | head -n1)
[ -z "$DESC" ] && DESC="no-desc"
cat >> $TMP <<EOF
screen_add if$i
widget_add if$i l1 string
widget_set if$i l1 1 1 $IF
widget_add if$i l2 string
widget_set if$i l2 1 2 $IP
widget_add if$i l3 string
widget_set if$i l3 1 1 $DESC
EOF
i=$((i+1))
done
nc 127.0.0.1 13666 < $TMPRendre exécutable :
chmod +x /usr/local/bin/lcd_firmware.shH) Script de démarrage (syshook)#
Modifier: nano /usr/local/etc/rc.syshook.d/start/50-lcdproc-sdeclcd.sh
#!/bin/sh
service LCDd restart
sleep 2
pkill lcdproc
[ -x /usr/local/bin/lcd_firmware.sh ] && /usr/local/bin/lcd_firmware.sh
chmod +x /usr/local/etc/rc.syshook.d/start/50-lcdproc-sdeclcd.shRedémarrer le pare-feu : après quelques minutes, les informations du script doivent s’afficher. Utiliser les flèches pour changer d’écran, ou Esc pour activer la rotation automatique.